Primavera P6 has the capability that it can perform all the major project management tasks including Project Scheduling, Project Tracking, Drawing Bar Charts or Gantt charts, Drawing Network Diagrams, Establishing the Critical Path.
CPM stands for Critical Path Method, Critical Path by Definition is the longest path of the project Network Diagram having maximum duration of the activities. The critical path also has another definition in terms of float.

Float or Slack is the duration in which the activity can be delayed or adjusted without delaying the actual project duration. The critical path includes the activities that have zero project float.
In Construction projects Float is of two types total Float and Free float. Total Float is the maximum time for which an activity can be delayed without delaying the project.
Whereas free float is maximum time for which an activity can be delayed without delaying the start of proceeding activity.
In any construction project the planning engineer first formulate WBS ( work breakdown structure) that divides the whole project in set of various works like electrical works, construction works, finishing works, plumbing works etc.
In WBS the planning engineer than assigns the activities to the corresponding WBS along with the durations estimated on the basis of past experience or some templates from the organization.
The thing that is very important in the planning stage of the project is to create links between various activities. The link or relation between activities is of two types:-
a) Predecessor
b) Successor
In primavera Successor activities are those that are to be performed immediately in succession of concerned activity. Predecessor activities are those that must be started or completed with the completion or startup of concerned activity.
Primavera relates activities in 4 different ways;
SF – Start to Finish
SS – Start to start
FS – Finish to start
FF – Finish to finish
In the planning stages we have to determine the most appropriate linkage between various activities so as to create the network diagram and determine the critical path.
In CPM calculations we determine the following;
a) Network diagram
b) Early Start
c) Early Finish
d) Late Start
e) Late Finish
f) Critical Path
g) Total Float
h) Free Float
Example;
Let’s do a simple example on Primavera to perform network diagram;
Step # 1;
Create a new project for that
File -> New Project or Press Ctrl + N
Click next in the Wizard; or select appropriate Enterprise Project Structure
Enter the Project ID as “Ex1” and Project Title as “Example 1” as shown;
Click Finish to terminate the Project.
In the Projects Directory Open the Project you have just created as shown;
Then go to activities by clicking the activity directory button as shown;
Right click anywhere in the activities panel and click ADD or Press insert button
In the activity Name enter A and in activity Orignal Duration Enter 3 as shown;
Repeat the above step and enter all the activities as shown in the table like this;
The Next step is to insert the activities relation as given in the table
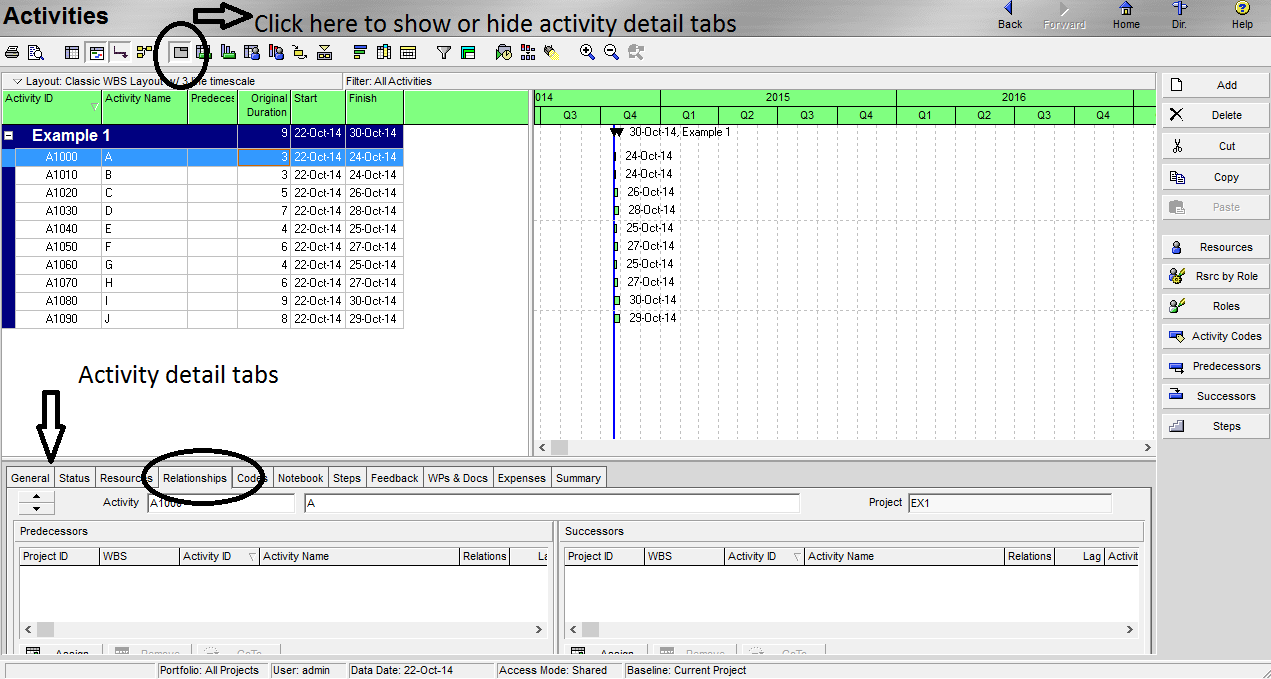
For that Click the activity for which you want to give the processor or successor in our example we will give the successor and will check the predecessors accordingly.
After clicking the activity go to the activity detail tabs go to relationships as shown;
Click the assign Successor command button on the command bar as shown;
Note; you can view the command bar button text from view->toolbars-> Command bar button text
From the assign successors dialog box select B C and D by Pressing Ctrl and using left mouse click;
After selecting the successors click the assign successor button as shown;
You will see in the activity details tabs relationships that B, C and D are added as successors.
Repeat the above procedure and assign the successor as shown in the above table.
After assigning successors you will see the predecessors already assigned as shown;
In the Next Step we will adjust the Activity layout columns to show the columns we needed for the CPM calculations;
For that right click in the activity panel and click columns as shown;
In the Columns dialog box;
By using ctrl + Click select the un-necessary columns as shown and click the remove from list button as shown;
In the available column options go to Dates-> select Early Start Early Finish Late Start Late Finish and click add to the list button as shown;
Similarly in the Duration category add Free float andTotal Float to the available list and Click Ok.
Your activity panel now should look like similar to the one show;
Now you are ready to complete the schedule process and do the CPM calculations;
For that go to Tools-> Schedule or Press F9 as shown;
Without changing anything in the schedule dialog box click the schedule button as shown;
After scheduling you will see the Gantt chart along with the CPM scheduling calculations as shown in the figure;
To see the network diagram and the critical path just click the Activty Network Button as shown; and then you will see the network diagram, the activities linked with red arrowheads dictate the critical path.
You can check the calculations and the network diagram using by-hand calculation and using CPM calculations by hand solved as follows;
CPM stands for Critical Path Method, Critical Path by Definition is the longest path of the project Network Diagram having maximum duration of the activities. The critical path also has another definition in terms of float.
Float or Slack is the duration in which the activity can be delayed or adjusted without delaying the actual project duration. The critical path includes the activities that have zero project float.
In Construction projects Float is of two types total Float and Free float. Total Float is the maximum time for which an activity can be delayed without delaying the project.
Whereas free float is maximum time for which an activity can be delayed without delaying the start of proceeding activity.
In any construction project the planning engineer first formulate WBS ( work breakdown structure) that divides the whole project in set of various works like electrical works, construction works, finishing works, plumbing works etc.
In WBS the planning engineer than assigns the activities to the corresponding WBS along with the durations estimated on the basis of past experience or some templates from the organization.
The thing that is very important in the planning stage of the project is to create links between various activities. The link or relation between activities is of two types:-
a) Predecessor
b) Successor
In primavera Successor activities are those that are to be performed immediately in succession of concerned activity. Predecessor activities are those that must be started or completed with the completion or startup of concerned activity.
Primavera relates activities in 4 different ways;
SF – Start to Finish
SS – Start to start
FS – Finish to start
FF – Finish to finish
In the planning stages we have to determine the most appropriate linkage between various activities so as to create the network diagram and determine the critical path.
In CPM calculations we determine the following;
a) Network diagram
b) Early Start
c) Early Finish
d) Late Start
e) Late Finish
f) Critical Path
g) Total Float
h) Free Float
Example;
Let’s do a simple example on Primavera to perform network diagram;
| Activity Name | Activity Duration | Successors |
| A | 3 | B,C,D |
| B | 3 | E,F,G |
| C | 5 | G |
| D | 7 | J,I |
| E | 4 | J,H |
| F | 6 | J |
| G | 4 | J |
| H | 6 | - |
| I | 9 | - |
| J | 8 | - |
Step # 1;
Create a new project for that
File -> New Project or Press Ctrl + N
 |
| Creating a New Project (Click to Enlarge) |
Enter the Project ID as “Ex1” and Project Title as “Example 1” as shown;
 |
| Give Name to the Project |
In the Projects Directory Open the Project you have just created as shown;
Then go to activities by clicking the activity directory button as shown;
 |
| Adding Activites (Click to Enlarge) |
 |
| Click Add (Click to Enlarge) |
 |
| Give Duration and name to activites |
 |
| All the activities (Click to Enlarge) |
For that Click the activity for which you want to give the processor or successor in our example we will give the successor and will check the predecessors accordingly.
 |
| Adding relations (Click to Enlarge) |
After clicking the activity go to the activity detail tabs go to relationships as shown;
Click the assign Successor command button on the command bar as shown;
Note; you can view the command bar button text from view->toolbars-> Command bar button text
 |
| Successors (Click to Enlarge) |
From the assign successors dialog box select B C and D by Pressing Ctrl and using left mouse click;
 |
| Assigning Successors (Click to Enlarge) |
After selecting the successors click the assign successor button as shown;
You will see in the activity details tabs relationships that B, C and D are added as successors.
 |
| Assigned accessors (Click to Enlarge) |
Repeat the above procedure and assign the successor as shown in the above table.
 |
| Check Predecessors |
After assigning successors you will see the predecessors already assigned as shown;
In the Next Step we will adjust the Activity layout columns to show the columns we needed for the CPM calculations;
For that right click in the activity panel and click columns as shown;
 |
| Adding Columns |
In the Columns dialog box;
By using ctrl + Click select the un-necessary columns as shown and click the remove from list button as shown;
 |
| Delet old ones (Click to Enlarge) |
In the available column options go to Dates-> select Early Start Early Finish Late Start Late Finish and click add to the list button as shown;
 |
| Adding New ones |
Similarly in the Duration category add Free float andTotal Float to the available list and Click Ok.
Your activity panel now should look like similar to the one show;
 |
| CPM Layout of activity table view |
Now you are ready to complete the schedule process and do the CPM calculations;
For that go to Tools-> Schedule or Press F9 as shown;
Without changing anything in the schedule dialog box click the schedule button as shown;
 |
| Scheduling(Click to Enlarge) |
After scheduling you will see the Gantt chart along with the CPM scheduling calculations as shown in the figure;
 |
| Scheduling Dialog Box |
To see the network diagram and the critical path just click the Activty Network Button as shown; and then you will see the network diagram, the activities linked with red arrowheads dictate the critical path.
 |
| CPM Scheduling |
 |
| CPM Network Diagram |
You can check the calculations and the network diagram using by-hand calculation and using CPM calculations by hand solved as follows;
 |
| Recheck the Work done (Click to Enlarge) |
From Editors Desk
So my friend this is a very basic tutorial for each and every beginner who doesn't know what is primavera or what actually primavera is capable off. The course of Project Management is learned in Civil Engineering in which CPM and PERT calculations are performed by hand, here in This tutorial we have used Primavera to just let you know how easy it is to perform all those scheduling and CPM calculations in just few clicks. I hope you would like this tutorial. Don't Forget to share it with your friends on fb and twitter. If you have any question Comment below


